
DeepDojo.AIPublished 2026-11-07Updated 2026-11-10中文
Write Better AI Image Prompts in Three Layers
To judge whether a prompt is any good, ask whether you can picture the image. Who is doing what, how is it arranged, where is the blank space, and what has to stay?
If you can answer those, you have a starting point you can revise. "Premium" and "refined" can stay, as long as concrete conditions come with them.
Once your Visual Brief is clear, you hold a lot of information: purpose, audience, product, title, size, and maybe a deadline and approval steps. Writing the prompt means choosing, and pulling out only what bears on this round's image.
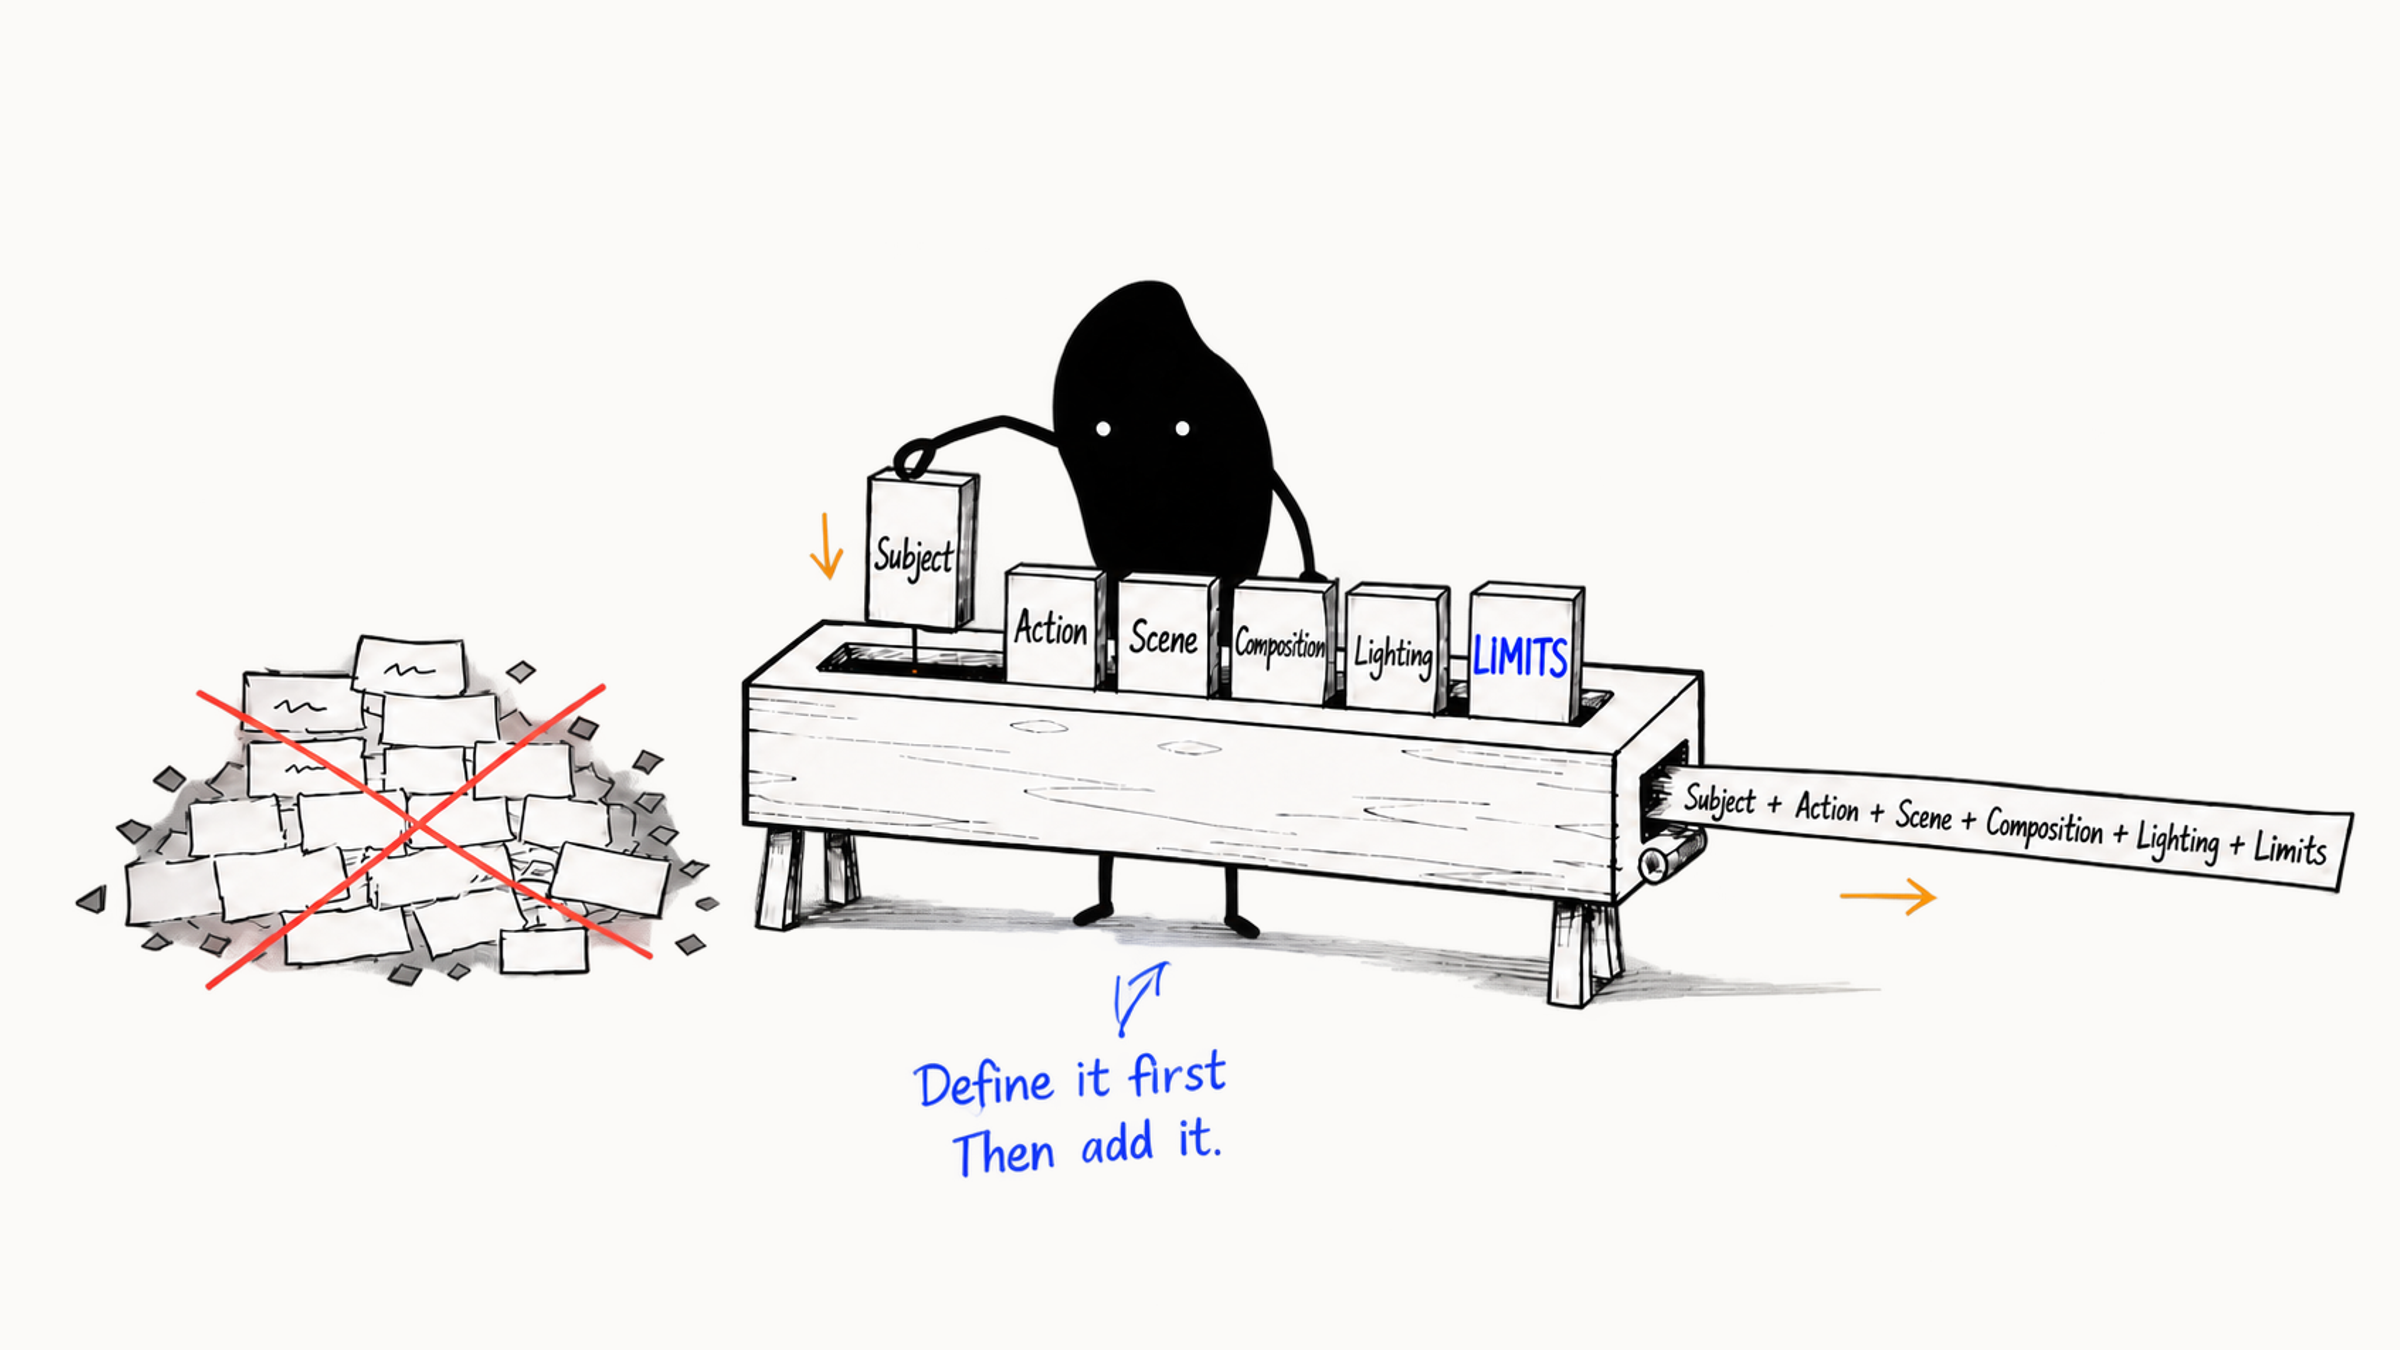
Start with the trunk: who is doing what, and where. Then add composition, light, and color, and only at the end write style and limits, keeping limits few and clear. When there are several objects, separate the main from the secondary, and the nine picture elements can serve as a gap check.
For editing an image, the prompt shifts to what to keep and which area to change. When you finish writing, compare it with the Brief to see whether you have taken everything relevant to this round, and check the common categories of problems too.
01 Write one sentence for this round's goal
Before the prompt, write one sentence about what this round is for. For example:
- Explore three main visual directions for a course cover.
- Fix the person and layout, and change only the background to a rainy street at night.
- Keep the product photo and generate an early-morning bathroom scene.
- Extend a square image to horizontal and add title space on the right.
Each goal needs different inputs. To find a direction from scratch, state subject, scene, and art style. When you've already picked an image, say what to keep and what to change. Once the direction settles, add composition, light, and material step by step.
If one sentence can't hold all your requirements, go back to this round's goal. Purpose, brand, text, and risk all matter, but some of them belong to post-production or acceptance. For now, the prompt only has to make this round's image clear.
Adobe’s prompting guide also recommends direct language with a specific subject and descriptive terms that make the desired details clear.
02 Nine picture elements, used as a checklist
A text-to-image prompt can draw its information from nine dimensions:
Subject + action or state + scene + composition + camera + light + color + style and material + limitsUse the nine as a checklist for gaps. A simple image needs only its essentials, so try it right away. A complex one gets more conditions, organized in parts. If you pad a prompt to fill every slot, you tend to muddle priorities that were already clear.
| Dimension | What to say about the image |
|---|---|
| Subject | Who or what you see first, with identity, count, and key features. Pair fixed characters and real products with a reference image |
| Action or state | What they are doing, their pose or mood, and how the person relates to props |
| Scene | Place, time, and background complexity, with the setting serving the subject |
| Composition | Subject position, spatial arrangement, and title space |
| Camera | Shot size, viewpoint, and depth of field, which decide whether to stress subject detail or spatial relations |
| Light | Source, direction, softness, and time, which is more specific than just "bright" |
| Color | Main and supporting colors, warm or cool, saturation, and contrast, which tie the image together |
| Style and material | One main visual type, plus visible surfaces such as glass, paper, or wood |
| Limits | Only the boundaries that affect usability, such as protecting a product, excluding wrong text, or leaving post-production space |
03 Write the core first, then add detail
Build the prompt in three layers:
Core of the image: who, doing what, where
  ↓
How it is viewed: composition, where we look from, light and color
  ↓
Output limits: style, material, blank space, text, and what to keep
When you hold an image in your head, you usually think of what the person is doing first and only later of camera and light. Write in that order: what happens in the picture, then where we view it from, and last the purpose requirements and what to keep. For example, the core first:
A young creator sits at a desk, drawing a colorful image on a screen with a stylus, in a bright home workspace.
Add how it is viewed:
Vertical medium shot, the person at lower left with space at the upper right, eye-level view, soft window side light, an off-white and light blue palette.
Then the output limits:
Modern lifestyle photography, natural desk material, low-detail background, no text, no logo, blank area kept clean.
You can picture it already. The person and action carry the theme, the composition makes room for a cover title, and light, color, and material add mood. If the title doesn't fit later, go back to composition. If the person's action is wrong, check the core of the image. For more specific ways to write composition, light, and color, see turning "premium feel" into composition, light, and color.
04 With several objects, rank them
When a prompt contains several objects, name the subject, the supporting elements, and the background elements. A vague version:
A girl, a robot, a dragon, a spaceship, a forest, a city, and a battle, epic cinematic feel.
Every element here fights for the center. Rewrite it like this:
A young girl in a gray travel outfit stands in the middle of a ruined city as the main subject. A dragon silhouette appears in the distant sky, and a small spaceship skims through the clouds. Low-angle wide cinematic composition, dusk backlight, a gray-blue city with a little orange firelight.
The rewrite makes choices. The girl is seen first, the dragon moves back, the spaceship shrinks, and the city becomes backdrop. The story is still there, and the eye has an order to follow. Three moves help organize a complex prompt: remove elements that serve no purpose, give the ones you keep a rank and position, and check that style, light, and composition point the same way.
Style needs a ranking too. "Lifestyle photography as the main style, with a touch of paper collage texture" makes the main style clear and keeps the secondary trait small. When several styles sit side by side, models tend to blend them, so pick one main style.
05 Keep limits few and clear
Limits suit three kinds of boundary: excluding wrong content, protecting existing content, and reserving post-production space.
| What to solve | How to write it |
|---|---|
| Exclude wrong content | No watermark, no wrong text, only one person in the frame |
| Protect existing content | Keep the face, pose, and jacket color |
| Reserve post-production space | Keep the left 35% low in detail for the title layout |
Each limit should solve a problem you have now. Describe the image you want first, then add the key exclusions. "Background not messy, not dark, not crowded," for example, is easier to judge once you rewrite it as "a bright light gray background with only one wooden table and one small potted plant, plenty of blank space."
Some tools offer a negative prompt, a field for what to exclude. Others work better when you state limits in everyday language. Check which the current tool supports, then write the limits this task needs.
06 How to write a prompt for editing an image
Text-to-image builds a picture from nothing, so it centers on subject, scene, composition, and visual direction. An editing prompt starts from an existing image and centers on what to keep, the area to change, the target state, and how to blend. Write an editing prompt in this order:
What to keep + where to change + what to change it into + how to blend with the original + boundaries to protectFor example:
Keep the person's face, hairstyle, pose, and the overall composition. Change only the person's jacket, turning the black jacket into a dark green waterproof jacket, with fabric folds, side-light direction, and shadows matching the original. Leave the background and hands as they are.
This instruction protects identity first, limits the area to the clothing, and then states the target material and its lighting. If your tool supports masks, circle the jacket as well, so text and region together control the edit range.
When you delete an object, also describe what fills the gap. For example, "Remove the red cup on the table and fill in the table with continuous wood grain and natural shadow." With just "delete the cup," the model may fill the gap with new clutter.
In a tool with selection controls, Firefly’s Generative Fill steps make this concrete: brush over the area, then describe what should fill it.
07 Four rounds of prompt changes on one cover
Suppose the Visual Brief asks for a vertical course cover for "learning AI drawing from zero." The audience is beginners, the image should feel friendly and clear, and the top is kept for the title.
Round one only sets the direction:
A young creator learning AI drawing for the first time sits at a computer, with a colorful digital illustration on screen, a bright home workspace, a friendly modern illustration style, vertical cover.
Look at this round's person, scene, and mood. Suppose the creator in the second image looks most natural and you want to keep it, but when you place a title box on it, there isn't enough room. Now the next goal is specific. Round two strengthens composition:
Keep the young creator, the computer, and the bright workspace. The person sits in the lower half of the frame, with the screen slightly to the right, and the top 35% is a clean light wall for the title later. Half-length medium shot, eye-level view.
Round two moves the person down to make room for the title. Once you confirm the layout works, changing light and color is easier to judge, because you can tell whether later changes disturbed the composition. Round three unifies the look:
Soft natural window light, off-white, light blue, and a little warm orange, low saturation, simple lines, a relaxed and clear image, reduced background detail.
With light and color set, round four tightens the number of people, the screen content, and the blank space:
Only one person in the frame, abstract color blocks on the screen, no readable text, logo, or watermark, top blank space kept clean.
Each later requirement was added after seeing the previous round. Only when the direction is right is it worth adjusting composition, and only when composition works do you move on to light and color. If the person's appearance changes noticeably along the way, bring the previous image back as a reference, or switch to editing mode and protect the subject first.
From round two onward, a short instruction should carry the previous image and what to keep. Two cases apply. To keep editing, provide the previous image, say that the person and layout stay, and then write this round's change. To regenerate with text-to-image, merge the confirmed subject, scene, and composition into the new prompt and change this round's goal. If you enter only "soft natural window light," the model has nothing about the person or layout to work from.
08 Five common problems
| Problem | How to fix it |
|---|---|
| Only abstract quality words | Add the subject and visible composition, light, color, and material |
| Elements compete for focus | Weaken related elements, set rank, distance, and position |
| Conditions conflict | Such as minimal vs ornate, or early morning vs neon night. Choose the set that suits the purpose |
| Detail before direction | Set subject and composition first, then add patterns and materials that actually help |
| A template carries old logic | Check topic, platform, style, and limits, and delete what the current task doesn't need |
09 Pull from the Brief, then check before generating
Look at the Brief again and it's easier to tell what belongs in the prompt. Deadlines, approvers, and archiving affect how the project runs. Subject, scene, composition, and light and color affect how the model draws. Official text, logos, and prices wait for post-production. Give each field in the Brief one of three destinations:
| Destination | What it holds | How to handle it |
|---|---|---|
| Generation input | Subject, action, scene, composition, light and color, style | Write into the prompt, with reference images where needed |
| Post-production | Titles, logos, prices, QR codes, exact layout | Add in design software |
| Acceptance check | Product accuracy, platform fit, permissions, and safety | Check item by item during selection and delivery |
Take a skincare ad. The Brief says: "for sensitive-skin users, show the real serum, clean and gentle look, horizontal web hero image, title on the right." The real bottle photo is fixed material, so the prompt only handles the setting:
Make a horizontal skincare scene from the product photo. Keep the glass bottle's shape, proportions, color, and label area. The product sits on the left on a light beige acrylic surface, the background is a clean, soft bathroom, diffused window light, a low-saturation off-white and light green palette, and the right 40% stays light and low in detail for layout later.
The web title, the brand logo, and the product's claimed benefits are left to design and copywriting. Once the model gets the setting right, it has done its job for this round.
After writing, check six things:
- Is there one core subject, with clear identity, count, and appearance?
- Are the action, the relationship between people and props, and the scene clear?
- Does the composition serve the purpose, such as the cover's title area, product size, or story relationships?
- Are light, color, and style consistent, with no opposite directions?
- Do the details help identify, convey emotion, or build realism? If not, delete them.
- Do the limits match the current risk? A text-free base image excludes text, a real product needs its structure protected, and an ordinary concept image gets checks that fit its purpose.
After the check, read the prompt and imagine the image: where is the subject, where does the camera look from, where does the light come from, where is the brightest spot, where is the blank space? If something is still unclear, add the note that will affect the result. When the prompt is long, read it paragraph by paragraph and see what each says. If two places say the same thing, keep the more specific one. If you can still picture the image after deleting, the cut was right.
Tools differ in how they handle natural language, phrases, fields, and parameters. Conversational tools suit stating purpose and edit intent. Some generation platforms prefer compact visual phrases. Local workflows separate the model, positive prompt, negative prompt, and settings. Write the image and priorities in plain language first, then adjust to the tool's habits.